View components is a new feature introduced in Asp.Net Core MVC or Asp.Net MVC 6.0. View Components helps us to develop re-usable components that emit HTML chunks in a parent view. Some examples are tag clouds, login panels, featured and recent articles, shopping cart, etc. It is a replacement feature for child action methods which helped us to develop re-usable components in previous versions of Asp.Net MVC. The child actions are again an action methods defined under a controller class which returns a partial view as response. They are called using HTML helper methods @Html.Action() or @Html.RenderAction() from a parent view. These child actions works similar to a typical controller-action methods that passes through full MVC request pipeline to produce the response. Unlike child actions, view components are light weight and does not have overhead of the child action methods. They cannot be accessed over HTTP and cannot do model binding.
View Components can also be compared to partial views, but the main difference is the model data required for partial view is passed from the parent view. But in case of View components, it can have its own controller-action like method which can do data access, perform business logic functions and return a view. Since it works very similar to controller-action methods, they follow strict separation of concerns and thus makes the view component code unit testable.
Implementing View Components
View components are nothing but a C# class with a Invoke() or InvokeAsync() method which returns a HTML response. We can create view components in 3 ways.
-
Using POCO classes
In this approach, we need to just define a class with name suffixed with ViewComponent. Example, TagCloudViewComponent, LatestArticleViewComponent, LoginViewComponent, etc. The class should include a method called Invoke() or InvokeAsync() that does the target action of view component and return a HTML response by either returning a view or string.
public class LatestArticleViewComponent
{
public IViewComponentResult Invoke()
{
return View();
}
}
-
View Components by extending ViewComponent class
This is the recommended approach where the Asp.Net Core framework provides the base class called ViewComponent for creating view components. The view component class should derive from the ViewComponent base class similar to below.
public class LatestArticleViewComponent : ViewComponent
{
public IViewComponentResult Invoke()
{
return View();
}
}
-
Using ViewComponent Attribute
You can use the ViewComponent attribute to create a view component class. The below code will make the LatestArticle class as view component.
[ViewComponent]
public class LatestArticle
{
public IViewComponentResult Invoke()
{
return View()
}
}
Also, you can specify an alternate name for the view component using the ViewComponent as below.
[ViewComponent(Name="FeaturedArticle")]
public class LatestArticle
{
Using View Components
To call the View component from parent view, we need to use the razor syntax @await Component.InvokeAsync("ViewComponentName").
Example
@await Component.InvokeAsync("LatestArticle")
Things you should know before creating View Component
-
View components fully support constructor Dependency Injection. The service to inject should be registered in Startup.ConfigureServices() method.
-
Creating View Component by deriving from ViewComponent class has many benefits like, you get access many useful properties like User, ViewContext, ViewData, Url , Request, HttpContext, RouteData, ModelState, ViewBag inside the view component.
-
No filters can be applied to a View Components.
-
The Asp.Net Core will search the below location for the partial view file for a view component by convention.
/Views/[Controller]/Components/[ComponentName]/Default.cshtml
/Views/Shared/Components/[ComponentName]/Default.cshtml
The [Controller] is the controller name. We can define seperate partial view in each controller's view directory. The view component will use the partial view under a controller's view directory when accesed from that controller else the partial view under Shared directory is used.
The [ComponentName] is view component name without the suffix ViewComponent. Example: If the view component is LatestArticleViewComponent then the folder name should be LatestArticle. As you can notice above, the default view name for a view component is Default.cshtml and not view component name itself.
-
The ViewComponent base class has methods to render partial views using View() overloads and encoded text using Content() method similar to a controller action methods. You can also return a partial view with model from the view component. The methods below.
return View();
return View("[viewname]");
return View([ViewModelObject]);
return View("[viewname]",[ViewModelObject]);
To return a encoded string,
return Content("Welcome to View Components!");
Additionally, you can return un-encoded HTML fragments by,
return new HtmlContentViewComponentResult(
new HtmlString("<b>Welcome to View Components!</b>"));
-
A view component takes any number of parameters through Invoke() method. Refer below.
public IViewComponentResult Invoke(string parameter)
The parameters can be passed when calling the view component like below.
@await Component.InvokeAsync("LatestArticle",new { parameter= "test" })
With this information, let’s move ahead and create a simple article carousel view component to have a better understanding. I will use Visual Studio 2017 community edition in this article for demonstration. You can download and install it from here. You can also download the full source code attached at the end of this article for reference.
Setting up the project
For easy understanding, let’s take the carousel implementation that comes as part of the default project template in Visual Studio 2017 to create this view component. Refer below.
Before creating the view component, let’s add a simple model class called Post and a repository implementation to get the list of articles for carousel component.
public class Post
{
public int PostId { get; set; }
public string Title { get; set; }
public string Description { get; set; }
public string URL { get; set; }
public string Category { get; set; }
public string CategoryImg { get; set; }
}
The repository interface and class implementation below. For simplicity, we will add an in-memory list of posts and return it form the repository class (InMemoryPostRepository).
public interface IPostRepository
{
IEnumerable<Post> Posts { get; }
}
public class InMemoryPostRepository : IPostRepository
{
private List<Post> posts = new List<Post> {
new Post{PostId=1,Title="",
Description ="",
URL ="",
Category ="", CategoryImg="" },
new Post{PostId=2,Title="",
Description ="",
URL ="",
Category ="", CategoryImg="" },
new Post{PostId=3,Title="",
Description ="",
URL ="",
Category ="", CategoryImg="" },
//Removed for brevity
};
public IEnumerable<Post> Posts => posts;
}
Now, let’s use these repository and create a PostController to display article categories and list of articles for each categories in a page.
public class PostController : Controller
{
private IPostRepository repositoryPost;
public PostController(IPostRepository _repositoryPost)
{
repositoryPost = _repositoryPost;
}
public ViewResult Index() => View(repositoryPost.Posts.Select(p => p.Category).Distinct());
public ViewResult List(string id) => View(repositoryPost.Posts.Where(p => p.Category == id).ToList());
}
Creating View Components By extending ViewComponent Class
A view component class can be created anywhere in the solution but as a convention let’s create it under a folder ViewComponents in the solution. Add a class under the ViewComponents folder and name it as ArticleCarouselViewComponent.cs. Code below.
public class ArticleCarouselViewComponent : ViewComponent
{
private IPostRepository repository;
public ArticleCarouselViewComponent(IPostRepository _repository)
{
repository = _repository;
}
public IViewComponentResult Invoke()
{
string Category = RouteData.Values["id"] as string;
if(Category != null)
{
return View(repository.Posts.Where(p => p.Category == Category).ToList());
}
else
{
return View(repository.Posts);
}
}
}
The above view component has dependency on IPostRepository and so we should register the dependency in Startup.ConfigureServices() method as below.
public void ConfigureServices(IServiceCollection services)
{
// Add framework services.
//Removed for brevity
services.AddTransient<IPostRepository, InMemoryPostRepository>();
}
We will add 2 partial views for this component, one under Post Controller and another in Shared folder as seen in the below image.
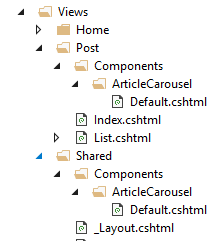
As mentioned earlier, when you access the action methods under post controller the view component will use the partial view under the Views/Post/Components/ArticleCarousel/, otherwise it will use the partial under Shared/Components/ArticleCarousel.
The partial view contents below.
Views/Post/Components/ArticleCarousel/Default.cshtml
@model IList<Post>
@{
int counter = 0;
}
<h3>Featured Articles - <strong>@(ViewContext.RouteData.Values["id"] ?? "All")</strong></h3>
<div id="myCarousel" class="carousel slide" data-ride="carousel" data-interval="6000">
<div class="carousel-inner" role="listbox">
@foreach (Post p in Model)
{
<div class="item @(counter==0 ? "active":"") ">
<img src="@p.CategoryImg" alt=" " class="img-responsive" />
<div class="carousel-caption" role="option">
<p><strong>@p.Title</strong></p>
<p>
@p.Description
<a class="btn btn-default" href="@p.URL">
Learn More
</a>
</p>
</div>
</div>
counter++;
}
</div>
<a class="left carousel-control" href="#myCarousel" role="button" data-slide="prev">
<span class="glyphicon glyphicon-chevron-left" aria-hidden="true"></span>
<span class="sr-only">Previous</span>
</a>
<a class="right carousel-control" href="#myCarousel" role="button" data-slide="next">
<span class="glyphicon glyphicon-chevron-right" aria-hidden="true"></span>
<span class="sr-only">Next</span>
</a>
</div>
Shared/Components/ArticleCarousel/Default.cshtml
@model IList<Post>
@{
int counter = 0;
}
<div id="myCarousel" class="carousel slide" data-ride="carousel" data-interval="6000">
<div class="carousel-inner" role="listbox">
@foreach (Post p in Model)
{
<div class="item @(counter==0 ? "active":"") ">
<img src="@p.CategoryImg" alt=" " class="img-responsive" />
<div class="carousel-caption" role="option">
<p><strong>@p.Title</strong></p>
<p>
@p.Description
<a class="btn btn-default" href="@p.URL">
Learn More
</a>
</p>
</div>
</div>
counter++;
}
</div>
<a class="left carousel-control" href="#myCarousel" role="button" data-slide="prev">
<span class="glyphicon glyphicon-chevron-left" aria-hidden="true"></span>
<span class="sr-only">Previous</span>
</a>
<a class="right carousel-control" href="#myCarousel" role="button" data-slide="next">
<span class="glyphicon glyphicon-chevron-right" aria-hidden="true"></span>
<span class="sr-only">Next</span>
</a>
</div>
To use the View component, we need to use the syntax @await Component.InvokeAsync("ViewComponentName") as mentioned above . In our case, let’s call the view component from _Layout page as seen in below code.
_Layout.cshtml
<div class="container body-content">
<div><label></label></div>
<div class="row">
@await Component.InvokeAsync("ArticleCarousel")
</div>
@RenderBody()
<hr />
<footer>
<p>© 2017 - ViewComponentsDemo</p>
</footer>
</div>
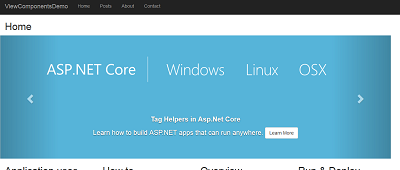
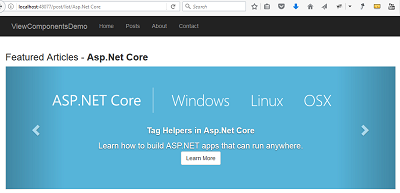
When executed, we will see the carousel component uses the partial view defined under Shared views folder for home controller action methods like below.
When accessing an action method in post controller, we will see the view component using the Default.cshtml under Post views folder.
Download the source and see it in action.
Happy Coding!!
Further Reading
- Read Difference Between Asp.Net and Asp.Net Core for a side by side difference.
- To know more about the new features in Asp.Net Core, read Breaking Changes and New Features of Asp.Net Core MVC.