Overview
In Part 1 and Part 2 of this article series, we understood the basics of Asp.Net Core Framework and creating our first Asp.Net Core application. In Part 2, we also understood the Asp.Net Core project structure, different configurations files and the Startup class used by Asp.Net Core project. In this part, let’s see how to create different types of deployment packages in detail.
Traditionally, Asp.Net application deployment packages consists of only application specific files, assemblies and dependent library components. These applications once deployed depends on .NetFramework installation on the server for the runtime and base class library support. Due to this, deploying a new application in a Production server has additional complexity of getting the required .NetFramework version installed prior to deploying the application. Most of the time, our application will be hosted in a shared server where other applications will be already sharing the resources. This means there is an additional risk when installing a newer framework which may break the existing applications running on that server.
The Asp.Net Core application brought in new way of developing and deploying applications which allowed developers to compose the required framework components themselves and thereby preventing the need to install .Net Core framework on the server. This composability feature is commonly called as modularity. This new feature enabled bin deployment of framework and runtime components privately for the application. Also, this ability to prepare self-contained packages removed the dependency on an external operations team (Infra team) for installations of frameworks on server and development machines.
Creating Deployment Package
There are 2 types of deployment packages in Asp.Net Core applications. They are,
-
Framework Dependent Deployment Package
In simple words, in this type the deployment package will contain only app specific files and assemblies and depends on the machine-wide .Net Core runtime installation. This is similar to deploying traditional Asp.Net application where we will have .NetFramework already installed on the server.
-
Self-Contained Deployment Package
In simple words, in this type the deployment package will contain app specific files and assemblies including .Net Core runtime components privately. This is similar to bin deployment and the app does not require .Net Core installed on the server.
Let’s see how we can create these 2 types of package using dotnet CLI commands and using Publish option in Visual Studio 2017 Community Edition.
Publishing Files Using dotnet CLI
Creating Framework Dependent Deployment Package
Let’s open the PowerShell console in Visual Studio (Yes, the same Package Manager Console). Type the below command to restore app dependent packages. It is always recommended to restore the packages and also build the project before publishing the files.
PM> dotnet restore
<!—Removed output for brevity -->
PM> dotnet build
Microsoft (R) Build Engine version 15.1.1012.6693
Copyright (C) Microsoft Corporation. All rights reserved.
ASPNETCoreVS2017Demo -> C:\Demo\ASPNETCoreVS2017Demo\ASPNETCoreVS2017Demo\bin\Debug\netcoreapp1.1\ASPNETCoreVS2017Demo.dll
Build succeeded.
0 Warning(s)
0 Error(s)
Time Elapsed 00:00:05.40
To create deployment package,
PM>dotnet publish -c Release
Microsoft (R) Build Engine version 15.1.1012.6693
Copyright (C) Microsoft Corporation. All rights reserved.
ASPNETCoreVS2017Demo -> C:\Demo\ASPNETCoreVS2017Demo\ASPNETCoreVS2017Demo\bin\Release\netcoreapp1.1\ASPNETCoreVS2017Demo.dll
The -c switch in the command allows to pass build configuration Release or Debug. This command will create framework dependent release files under “\bin\Release\netcoreapp1.1\publish” folder in the project root. Something like below,
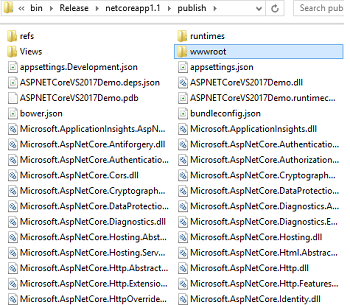
As you can see in the above image, all the application related assemblies are directly copied to the folder instead of bin directory. The refs folder contains all application referenced assemblies. The runtime folder will contain assemblies specific to target platforms for self-contained application. The wwwroot folder will contain application’s client side stuffs like scripts, css files, images and fonts. Views folder contains the razor view files used in the application.
Next, let’s see how we can create self-contained deployment package using dotnet CLI.
Creating Self-Contained Deployment Package
To create self-contained deployment package, we need to first specify the target operating system (or Runtime Identifiers) the package is targeted to deploy. Since, Asp.Net Core app is cross platform, we need this setting to be specified when creating self-contained packages. Please note the framework components including runtime are natively compiled to target platforms and so they will be different for different targets. This setting goes under the <RuntimeIdentifiers> tag in project file. The runtime identifiers or simply RID is a string that identifies a target runtime. For example, to create package for Windows 10 X64 machine, it is win10-x64. To set this, right click you project in solution explorer and click “Edit project file”. The <RuntimeIdentifiers> settings should be part of <PropertyGroup> settings under the <Project> node.
<PropertyGroup>
<RuntimeIdentifiers>win10-x64;osx.10.11-x64</RuntimeIdentifiers>
</PropertyGroup>
As you can see, we can specify multiple RID’s to create package for multiple targets. After saving the project file, we need to first run dotnet restore to restore packages for the additional runtime components before firing publish command.
To publish, we need to run the publish command with RID for a target platform. For example to get win10-x64 deployment package,
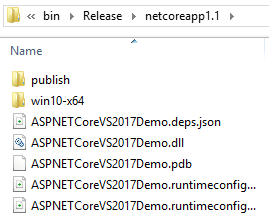
PM> dotnet publish -c Release -r win10-x64
Microsoft (R) Build Engine version 15.1.1012.6693
Copyright (C) Microsoft Corporation. All rights reserved.
ASPNETCoreVS2017Demo -> C:\Demo\ASPNETCoreVS2017Demo\ASPNETCoreVS2017Demo\bin\Release\netcoreapp1.1\win10-x64\ASPNETCoreVS2017Demo.dll
This would have created the release package under “bin\Release\netcoreapp1.1” with the RID name as folder name similar to below,
Similarly, to get osx.10.11-x64 package (Mac OS),
PM> dotnet publish -c Release -r osx.10.11-x64
This will create the package under the folder name osx.10.11-x64 similar to above image.
To Learn more about dotnet CLI, read Learn dotnet CLI(Command Line Interface for .Net Core) in 10 Minutes.
Runtime Identifiers (RID) Reference List
You can find the full RID list here.
Publishing Using Visual Studio Publish Wizard
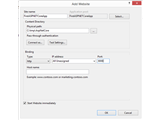
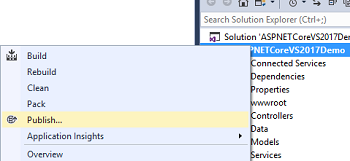
The Visual Studio’s publishing wizard works similar to previous versions where we can create profiles for publishing files. To do this, right click project in solution explorer and click “Publish..”
On Publish tab, click “Create New Profile..” link to open the publishing configuration wizard. This will open a dialogue similar to below,
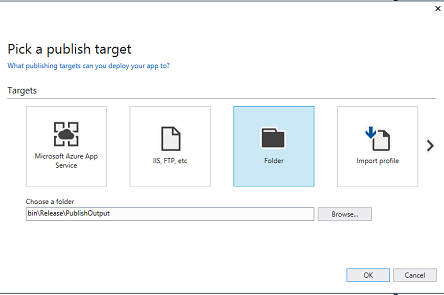
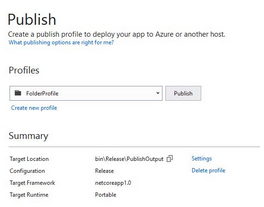
For simplicity, let us publish to a local folder. Click Folder and specify a local folder and Click OK. Click Publish button on the Publish Summary screen to publish the files. After publishing you can see the release package under “\bin\Release\PublishOutput” or the folder path you specified when creating the profile.
For self-contained package, we need to set the Runtime Identifiers as appropriate in project file as mentioned in creating deployment package using dotnet CLI previously. Clicking Publish will create release package under the folder specified per Runtime Identifiers i.e. each RID will have a separate release package under the folder “\bin\Release\PublishOutput”.
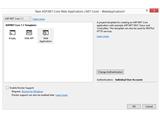
Alternatively, you can create separate profile for each RID by specifying the Target Runtime in the Publish summary screen as seen below.
In Visual Studio 2017 Community edition, this feature to set Target Runtime is currently not seen. Need to confirm if it is not available in Community Edition. We can use dotnet CLI to create package for different runtimes if you too did not find this in your IDE.
In next part, we will understand how to host the Asp.Net Core application and the basics of hosting environment.
Further Reading
- Read Difference Between Asp.Net and Asp.Net Core for a side by side difference.
- To know more about the new features in Asp.Net Core, read Breaking Changes and New Features of Asp.Net Core MVC.