In my previous article, Introduction to Asp.Net Identity we have learned the basics and why Asp.Net Identity was introduced. The visual studio web project templates (from 2013) now include all the required Nuget packages and a default implementation of AccountController with User Registration, Sign-in using local and external providers(OAuth providers) to begin using Asp.Net Identity.
Before creating a project, let’s see what are the major objects exposed by Asp.Net Identity framework and its usages. As I said in my previous article, the core Identity package “Microsoft.AspNet.Identity.Core” is an abstraction layer that includes all the core interfaces required for implementing Asp.Net Identity. These interface are implemented for EF Code First in the package Microsoft.AspNet.Identity.EntityFramework and it is used by default in all the Asp.Net web projects created by Visual Studio. A better understanding of these core interface (or the class implementation) will help us to customize it for our application needs easily.
Asp.Net Identity Core Objects
They are,
IUser
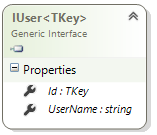
This is the User object or the Application’s User object should inherit this interface. It has 2 primary properties Id and UserName. So, this enforces the application to supply atleast these 2 properties for a User object.
IUserStore
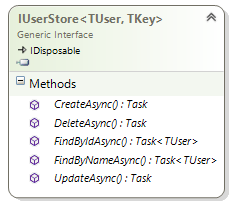
This is the core interface to provide CRUD operation for User object. The package Microsoft.AspNet.Identity.EntityFramework has a UserStore implementation object which implements this interface to support EF code first data access.
You need to implement this interface to provide your own customized user store for persisting to a different data sources.
UserManager
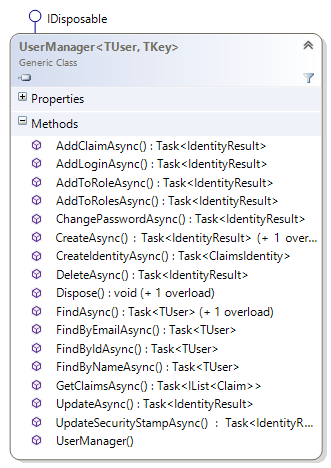
This is main class or the domain logic class (or similar to Context class) used to manage User object. All operations on User object(Creation,Deletion,Updation,PasswordReset,Role Management, etc) are done through this class. This class uses the IUserStore implementation object to work with the database. The IUserStore object is passed as a constructor parameter during instantiation.
Note - Some methods are hidden in the above class diagram for brevity.
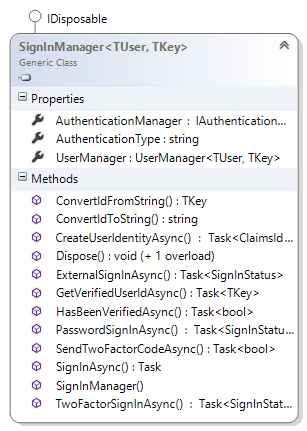
SignInManager
This class is used for SignIn operations and it is part of the OWIN middleware package Microsoft.AspNet.Identity.Owin.
Note – There are other core interfaces like IUserPasswordStore, IUserLoginStore, IUserRoleStore, etc for providing other core features. Understanding the above 4 interfaces at the minimum will be a good to start learning Asp.Net Identity. We will primarily use these 4 interfaces when we create our first application.
Next section, lets create a MVC project and we will study the project template’s default implementation of AccountController for user creation and sign-in. This will help us greatly in understanding Asp.Net Identity and their related objects usage in our projects. It is also a very good source to understand the Asp.Net Identity implementation for a real time use.
Creating a MVC Project with Asp.Net Identity
-
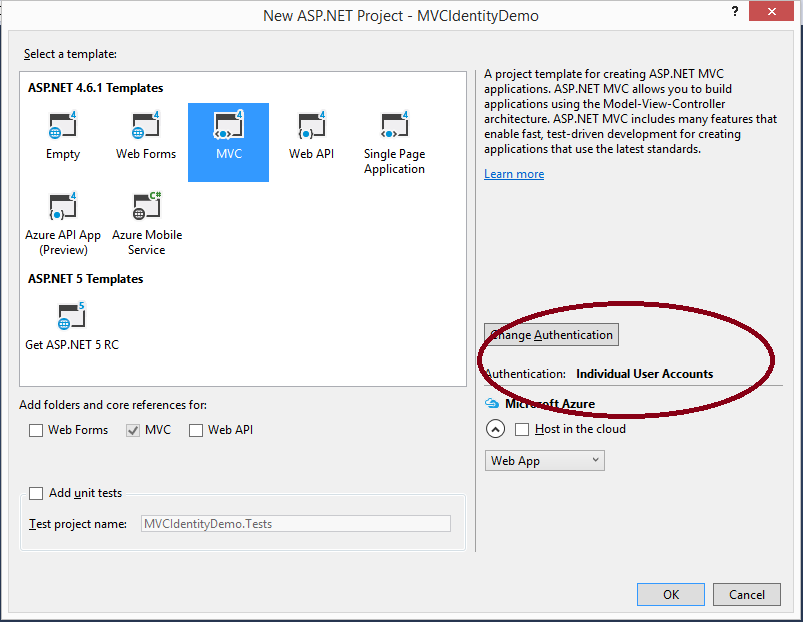
Open Visual Studio 2015. Click File > New > Project..
-
Select a MVC template and select Authentication as “Individual User Accounts”. Click OK.
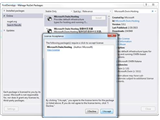
As i said previously, all the Nuget packages for Asp.Net Identity are included with the project. To re-cap, the packages are,
- Microsoft.AspNet.Identity.Core
- Microsoft.AspNet.Identity.EntityFramework
- Microsoft.AspNet.Identity.OWIN
Note – If you choose “Empty” project in project template type then you need to include these Nuget packages yourselves. On an existing project types which already includes these packages, you might to need to update the packages to newer versions if available, to do this, In Solution Explorer, right click project and click “Manage Nuget Packages..”. Go to Updates tab and select all packages and click Update.
When you run this application, you can register as a new user and sign-in successfully. The EF code first UserStore implementation will store the data into a SqlExpress database created under App_Data. So, we now have a fully working Asp.Net Identity based authentication module in our new project.
Let’s examine and understand the default settings and the authentication mechanism the project has created using Asp.Net Identity system.
Web.Config Settings
We will see a major change in Web.Config settings where the FormsAuthentication module is now removed. Please see below,
<system.web>
<authentication mode="None" />
<compilation debug="true" targetFramework="4.6.1" />
<httpRuntime targetFramework="4.6.1" />
</system.web>
<system.webServer>
<modules>
<remove name="FormsAuthentication" />
</modules>
</system.webServer>
This is because, in OWIN based application the default Forms Authentication module will be removed and a similar authentication middleware called CookieAuthentication will be added to OWIN pipeline for Asp.Net Identity. You could see this in Startup.ConfigureAuth() method under App_Start folder. The authentication configurations like login page URL will be set from CookieAuthenticationOptions in the middleware.
Note – Please note the Forms Authentication module is HttpModule that is dependent on System.Web. The basic principle behind OWIN is to remove the dependency with IIS and so System.Web assembly.
Startup class - OWIN Pipeline Setup
The project have added a default OWIN pipeline setup done in Startup.Auth.cs file under App_Start folder. For now, let’s use only local application sign-in accounts for this article and disable other external authentication middlewares and two-factor authentication middlewares. The final Startup method will have only the CookieAuthentication middleware and it looks like,
public partial class Startup
{
// For more information on configuring authentication, please visit http://go.microsoft.com/fwlink/?LinkId=301864
public void ConfigureAuth(IAppBuilder app)
{
// Configure the db context, user manager and signin manager to use a single instance per request
app.CreatePerOwinContext(ApplicationDbContext.Create);
app.CreatePerOwinContext<ApplicationUserManager>(ApplicationUserManager.Create);
app.CreatePerOwinContext<ApplicationSignInManager>(ApplicationSignInManager.Create);
// Enable the application to use a cookie to store information for the signed in user
// and to use a cookie to temporarily store information about a user logging in with a third party login provider
// Configure the sign in cookie
app.UseCookieAuthentication(new CookieAuthenticationOptions
{
AuthenticationType = DefaultAuthenticationTypes.ApplicationCookie,
LoginPath = new PathString("/Account/Login"),
Provider = new CookieAuthenticationProvider
{
// Enables the application to validate the security stamp when the user logs in.
// This is a security feature which is used when you change a password or add an external login to your account.
OnValidateIdentity = SecurityStampValidator.OnValidateIdentity<ApplicationUserManager, ApplicationUser>(
validateInterval: TimeSpan.FromMinutes(30),
regenerateIdentity: (manager, user) => user.GenerateUserIdentityAsync(manager))
}
});
//app.UseExternalSignInCookie(DefaultAuthenticationTypes.ExternalCookie);
// Enables the application to temporarily store user information when they are verifying the second factor in the two-factor authentication process.
//app.UseTwoFactorSignInCookie(DefaultAuthenticationTypes.TwoFactorCookie, TimeSpan.FromMinutes(5));
// Enables the application to remember the second login verification factor such as phone or email.
// Once you check this option, your second step of verification during the login process will be remembered on the device where you logged in from.
// This is similar to the RememberMe option when you log in.
//app.UseTwoFactorRememberBrowserCookie(DefaultAuthenticationTypes.TwoFactorRememberBrowserCookie);
// Uncomment the following lines to enable logging in with third party login providers
//app.UseMicrosoftAccountAuthentication(
// clientId: "",
// clientSecret: "");
//app.UseTwitterAuthentication(
// consumerKey: "",
// consumerSecret: "");
//app.UseFacebookAuthentication(
// appId: "",
// appSecret: "");
//app.UseGoogleAuthentication(new GoogleOAuth2AuthenticationOptions()
//{
// ClientId = "",
// ClientSecret = ""
//});
}
}
The first 3 lines of code that calls the method app.CreatePerOwinContext() are used by Asp.Net Identity systems and it helps the application to use a single instance per request. This is similar to having one DBContext class per request. Next line includes the CookieAuthentication middleware into the owin pipeline to replace Forms Authentication modules for setting cookies. All the Authentication settings like LoginPath that we set in Web.Config goes here.
Note - You could see many other lines of code for UseExternalSignInCookie and some commented out code for OAuth. Let’s ignore this for now and understand other basic things.
The settings required for running Asp.Net Identity ends here. Next, to register and sign-in users (from AccountController), the app needs User, UserManager, UserStore and SignInManager object. These are included in the class files IdentityConfig.cs(under App_Start folder) and IdentityModels.cs(under Models folder).
Identity Objects and Model Implementation:
IdentityConfig.cs Classes
The application’s user manager class called ApplicationUserManager is included here.
public class ApplicationUserManager : UserManager<ApplicationUser>
{
public ApplicationUserManager(IUserStore<ApplicationUser> store)
: base(store)
{
}
public static ApplicationUserManager Create(IdentityFactoryOptions<ApplicationUserManager> options, IOwinContext context)
{
var manager = new ApplicationUserManager(new UserStore<ApplicationUser>(context.Get<ApplicationDbContext>()));
// Configure validation logic for usernames
//Removed for brevity
return manager;
}
}
The ApplicationUserManager class(the domain logic class or context class) takes the IUserStore object as constructor parameter. So, the callee should provide a concrete implementation of a UserStore for the Manager to act. The code bolded above in Create method passes the ApplicationDbContext as constructor parameter of UserStore, it is the EF Code First UserStore implementation object for the Manager class to use. This is what the app.CreatePerOwinContext<ApplicationUserManager>(ApplicationUserManager.Create) method registration in Startup class is using to get the ApplicationManager object. There are other lines codes for password complexity configuration, two factor authentication providers are not required for now and are removed for brevity.
And there is this ApplicationSignInManager class that contains a overridden method to assist the User object to generate claims. We will see this in detail in another article. For now, let’s understand it is there for this reason. The Create method in this class is for creating object of this class which is used in Startup method for per request object creation.
public class ApplicationSignInManager : SignInManager<ApplicationUser, string>
{
public ApplicationSignInManager(ApplicationUserManager userManager, IAuthenticationManager authenticationManager)
: base(userManager, authenticationManager)
{
}
public override Task<ClaimsIdentity> CreateUserIdentityAsync(ApplicationUser user)
{
return user.GenerateUserIdentityAsync((ApplicationUserManager)UserManager);
}
//Removed for brevity
}
Note - The application get access to ApplicationUserManager and ApplicationSignInManager object by calling Context.GetOwinContext().Get<[Type]>() method. Both these class expose their objects through Create() method that is registered in Startup class. The below public properties under AccountController gets the access to these objects.
public ApplicationSignInManager SignInManager
{
get
{
return _signInManager ?? HttpContext.GetOwinContext().Get<ApplicationSignInManager>();
}
private set
{
_signInManager = value;
}
}
public ApplicationUserManager UserManager
{
get
{
return _userManager ?? HttpContext.GetOwinContext().GetUserManager<ApplicationUserManager>();
}
private set
{
_userManager = value;
}
}
User Models in IdentityModels.cs
This is where the application’s User object and EF DBContext objects are defined. The IdentityUser and IdentityDbContext object are EF Code First Implementation of IUser object and its abstract context class. The IdentityUser and IdentityDbContext object are defined under Microsoft.AspNet.Identity.EntityFramework package and our model classes derives it for application customization. We can add more user claims from GenerateUserIdentityAsync method if required.
public class ApplicationUser : IdentityUser
{
public async Task<ClaimsIdentity> GenerateUserIdentityAsync(UserManager<ApplicationUser> manager)
{
// Note the authenticationType must match the one defined in CookieAuthenticationOptions.AuthenticationType
var userIdentity = await manager.CreateIdentityAsync(this, DefaultAuthenticationTypes.ApplicationCookie);
// Add custom user claims here
return userIdentity;
}
}
public class ApplicationDbContext : IdentityDbContext<ApplicationUser>
{
public ApplicationDbContext()
: base("DefaultConnection", throwIfV1Schema: false)
{
}
public static ApplicationDbContext Create()
{
return new ApplicationDbContext();
}
}
AccountController
The default AccountController will use the above objects to create and login user.
Register Action
[HttpPost]
[AllowAnonymous]
[ValidateAntiForgeryToken]
public async Task<ActionResult> Register(RegisterViewModel model)
{
if (ModelState.IsValid)
{
var user = new ApplicationUser { UserName = model.Email, Email = model.Email };
var result = await UserManager.CreateAsync(user, model.Password);
if (result.Succeeded)
{
await SignInManager.SignInAsync(user, isPersistent:false, rememberBrowser:false);
// For more information on how to enable account confirmation and password reset please visit http://go.microsoft.com/fwlink/?LinkID=320771
// Send an email with this link
// string code = await UserManager.GenerateEmailConfirmationTokenAsync(user.Id);
// var callbackUrl = Url.Action("ConfirmEmail", "Account", new { userId = user.Id, code = code }, protocol: Request.Url.Scheme);
// await UserManager.SendEmailAsync(user.Id, "Confirm your account", "Please confirm your account by clicking <a href=\"" + callbackUrl + "\">here</a>");
return RedirectToAction("Index", "Home");
}
AddErrors(result);
}
// If we got this far, something failed, redisplay form
return View(model);
}
On execution, the Register action method will create and authenticate the user. The call to SignInManager.SignInAsync method will generate the AuthenticationResponseGrant with Claimsdentity and ClaimsPrincipal object for the Owin middleware to create application cookie.
Sign-in Auth Cookie Generation
The auth cookie will be generated and added to the Response Cookie collection when the ApplicationCookie authentication middleware sees the AuthenticationResponseGrant object. Please note that any middleware will have 2 chances to run for a request, once during beginning of page/url request and another during end of request. The cookie gets added to response when the middleware runs again(second time at the end of request) only when AuthenticationResponseGrant is present.
Login Action
[HttpPost]
[AllowAnonymous]
[ValidateAntiForgeryToken]
public async Task<ActionResult> Login(LoginViewModel model, string returnUrl)
{
if (!ModelState.IsValid)
{
return View(model);
}
// This doesn't count login failures towards account lockout
// To enable password failures to trigger account lockout, change to shouldLockout: true
var result = await SignInManager.PasswordSignInAsync(model.Email, model.Password, model.RememberMe, shouldLockout: false);
switch (result)
{
case SignInStatus.Success:
return RedirectToLocal(returnUrl);
case SignInStatus.LockedOut:
return View("Lockout");
case SignInStatus.RequiresVerification:
return RedirectToAction("SendCode", new { ReturnUrl = returnUrl, RememberMe = model.RememberMe });
case SignInStatus.Failure:
default:
ModelState.AddModelError("", "Invalid login attempt.");
return View(model);
}
}
The login action uses SignInManager.PasswordSignInAsync() method to SignIn the user by passing username and password from the post parameters. The cookie generation is again done by the CookieAuthentication middleware as mentioned for Register method.
The AccountController has many other actions and helper methods for external providers, 2 factor authentication, etc. The intention of this article to understand the basics of using Identity framework by restricting local user authentication alone for simplicity. We will see about these things in detail in a future article. The source project is attached with this article for reference.