CODEDIGEST
Home » Articles
Search
 

Technologies
 

Sponsored links
 

CodeDigest Navigation
 

Technology News
No News Feeds available at this time.
 

Community News
No News Feeds available at this time.
 
ASP.NET Social Networks - Making Friends - Part 2

By DotNet Tutor
Posted On Jan 14,2009
Article Rating:
Average Rating: 5
No of Ratings: 1
No of Comments: 9
Category: ASP.Net
Print this article.

ASP.NET Social Networks - Making Friends - Part 2

Introduction

In the first part of this article we concentrated on two aspects Problem and Design. We started with the Problem, that is, defining what we need to implement the Friends concept, finding and inviting friends to join our network and developing an alert system. We then moved to Design wherein we actually finalized the requirements. And finally we began with the Solution, that is, actually implementing the features. In this part of the article by Andrew Siemer, we will continue with the solution part.

Implementing the presentation layer

Now that we have the base framework in place, we can start to discuss what it will take to put it all together.


Searching for friends

Let's see what it takes to implement a search for friends.


SiteMaster

Let's begin with searching for friends. We haven't covered too much regarding the actual UI and nothing regarding the master page of this site. Putting in simple words, we have added a text box and a button to the master page to take in a search phrase. When the button is clicked, this method in the MasterPage code behind is fired.

protected void ibSearch_Click(object sender, EventArgs e)
{
    _redirector.GoToSearch(txtSearch.Text);
}

As you can see it simply calls the Redirector class and routes the user to the Search.aspx page passing in the value of txtSearch (as a query string parameter in this case).

public void GoToSearch(string SearchText)
{
   Redirect("~/Search.aspx?s=" + SearchText);
}


Search

The Search.aspx page has no interface. It expects a value to be passed in from the previously discussed text box in the master page. With this text phrase we hit our AccountRepository and perform a search using the Contains() operator. The returned list of Accounts is then displayed on the page. For the most part, this page is all about MVP (Model View Presenter) plumbing. Here is the repeater that displays all our data.


<%@ Register Src="~/UserControls/ProfileDisplay.ascx" TagPrefix="Fisharoo"
                  TagName="ProfileDisplay" %>

...

<asp:Repeater ID="repAccounts" runat="server"
                  OnItemDataBound="repAccounts_ItemDataBound">
    <ItemTemplate>
        <Fisharoo:ProfileDisplay ShowDeleteButton="false"
                       ID="pdProfileDisplay" runat="server">
                     </Fisharoo:ProfileDisplay>
    </ItemTemplate>
</asp:Repeater>

The fun stuff in this case comes in the form of the ProfileDisplay user control that was created so that we have an easy way to display profile data in various places with one chunk of reusable code that will allow us to make global changes.

A user control is like a small self-contained page that you can then insert into your page (or master page). It has its own UI and it has its own code behind (so make sure it also gets its own MVP plumbing!). Also, like a page, it is at the end of the day a simple object, which means that it can have properties, methods, and everything else that you might think to use.

Once you have defined a user control you can use it in a few ways. You can programmatically load it using the LoadControl() method and then use it like you would use any other object in a page environment. Or like we did here, you can add a page declaration that registers the control for use in that page. You will notice that we specified where the source for this control lives. Then we gave it a tag prefix and a tag name (similar to using asp:Control). From that point onwards we can refer to our control in the same way that we can declare a TextBox!

You should see that we have <Fisharoo:ProfileDisplay ... />. You will also notice that our tag has custom properties that are set in the tag definition. In this case you see ShowDeleteButton="false". Here is the user control code in order of display, code behind, and the presenter:


//UserControls/ProfileDisplay.ascx
<%@ Import namespace="Fisharoo.FisharooCore.Core.Domain"%>
<%@ Control Language="C#" AutoEventWireup="true"
          CodeBehind="ProfileDisplay.ascx.cs"
          Inherits="Fisharoo.FisharooWeb.UserControls.ProfileDisplay" %>
<div style="float:left;">
    <div style="height:130px;float:left;">
        <a href="/Profiles/Profile.aspx?AccountID=<asp:Literal
             id='litAccountID' runat='server'></asp:Literal>">
        <asp:Image style="padding:5px;width:100px;height:100px;"
              ImageAlign="Left" Width="100"
                  Height="100" ID="imgAvatar"
                ImageUrl="~/images/ProfileAvatar/ProfileImage.aspx"
                    runat="server" /></a>
        <asp:ImageButton ImageAlign="AbsMiddle" ID="ibInviteFriend"
                   runat="server" Text="Become Friends"
        OnClick="lbInviteFriend_Click"
       ImageUrl="~/images/icon_friends.gif"></asp:ImageButton>
        <asp:ImageButton ImageAlign="AbsMiddle" ID="ibDelete"
                          runat="server" OnClick="ibDelete_Click"
                          ImageUrl="~/images/icon_close.gif" /><br />
        <asp:Label ID="lblUsername" runat="server"></asp:Label><br />
        <asp:Label ID="lblFirstName" runat="server"></asp:Label>
        <asp:Label ID="lblLastName" runat="server"></asp:Label><br />
        Since: <asp:Label ID="lblCreateDate"
                       runat="server"></asp:Label><br />
        <asp:Label ID="lblFriendID" runat="server"
              Visible="false"></asp:Label>
    </div>       
</div>

//UserControls/ProfileDisplay.ascx.cs
using System;
using System.Collections;
using System.Configuration;
using System.Data;
using System.Linq;
using System.Web;
using System.Web.Security;
using System.Web.UI;
using System.Web.UI.HtmlControls;
using System.Web.UI.WebControls;
using System.Web.UI.WebControls.WebParts;
using System.Xml.Linq;
using Fisharoo.FisharooCore.Core.Domain;
using Fisharoo.FisharooWeb.UserControls.Interfaces;
using Fisharoo.FisharooWeb.UserControls.Presenters;

namespace Fisharoo.FisharooWeb.UserControls
{
    public partial class ProfileDisplay : System.Web.UI.UserControl,
                                          IProfileDisplay
    {
        private ProfileDisplayPresenter _presenter;
        protected Account _account;

        protected void Page_Load(object sender, EventArgs e)
        {
            _presenter = new ProfileDisplayPresenter();
            _presenter.Init(this);
            ibDelete.Attributes.Add("onclick","javascript:return
                               confirm('Are you sure you want
                                       to delete this friend?')");
        }

        public bool ShowDeleteButton
        {
            set
            {
                ibDelete.Visible = value;
            }
        }

        public bool ShowFriendRequestButton
        {
            set
            {
                ibInviteFriend.Visible = value;
            }
        }
        public void LoadDisplay(Account account)
        {
            _account = account;
            ibInviteFriend.Attributes.Add("FriendsID",_account.AccountID.ToString());
            ibDelete.Attributes.Add("FriendsID",
                                  _account.AccountID.ToString());
            litAccountID.Text = account.AccountID.ToString();
            lblLastName.Text = account.LastName;
            lblFirstName.Text = account.FirstName;
            lblCreateDate.Text = account.CreateDate.ToString();
            imgAvatar.ImageUrl += "?AccountID=" +
                                account.AccountID.ToString();
            lblUsername.Text = account.Username;
            lblFriendID.Text = account.AccountID.ToString();
        }

        protected void lbInviteFriend_Click(object sender,
                                            EventArgs e)
        {
            _presenter = new ProfileDisplayPresenter();
            _presenter.Init(this);
            _presenter.SendFriendRequest(Convert.ToInt32(lblFriendID.Text));
        }

        protected void ibDelete_Click(object sender, EventArgs e)
        {
            _presenter = new ProfileDisplayPresenter();
            _presenter.Init(this);
            _presenter.DeleteFriend(Convert.ToInt32(lblFriendID.Text));
        }
    }
}

//UserControls/Presenter/ProfileDisplayPresenter.cs
using System;
using System.Data;
using System.Configuration;
using System.Linq;
using System.Web;
using System.Web.Security;
using System.Web.UI;
using System.Web.UI.HtmlControls;
using System.Web.UI.WebControls;
using System.Web.UI.WebControls.WebParts;
using System.Xml.Linq;
using Fisharoo.FisharooCore.Core;
using Fisharoo.FisharooCore.Core.DataAccess;
using Fisharoo.FisharooWeb.UserControls.Interfaces;
using StructureMap;

namespace Fisharoo.FisharooWeb.UserControls.Presenters
{
    public class ProfileDisplayPresenter
    {
        private IProfileDisplay _view;
        private IRedirector _redirector;
        private IFriendRepository _friendRepository;
        private IUserSession _userSession;

        public ProfileDisplayPresenter()
        {
            _redirector = ObjectFactory.GetInstance<IRedirector>();
            _friendRepository =
                      ObjectFactory.GetInstance<IFriendRepository>();
            _userSession = ObjectFactory.GetInstance<IUserSession>();
        }

        public void Init(IProfileDisplay view)
        {
            _view = view;
        }

        public void SendFriendRequest(Int32 AccountIdToInvite)
        {
            _redirector.GoToFriendsInviteFriends(AccountIdToInvite);
        }

        public void DeleteFriend(Int32 FriendID)
        {
            if (_userSession.CurrentUser != null)
            {
                _friendRepository.DeleteFriendByID(_userSession.CurrentUser.AccountID
                                 , FriendID);
                HttpContext.Current.Response.Redirect(HttpContext.Current.Request.Raw
                                      Url);
            }
        }
    }
}


All this logic and display is very standard. You have the MVP plumbing, which makes up most of it. Outside of that you will notice that the ProfileDisplay control has a LoadDisplay() method responsible for loading the UI for that control. In the Search page this is done in the repAccounts_ItemDataBound() method.

protected void repAccounts_ItemDataBound(object sender,
                                         RepeaterItemEventArgs e)
{
    if(e.Item.ItemType == ListItemType.Item || e.Item.ItemType ==
                          ListItemType.AlternatingItem)
    {
        ProfileDisplay pd = e.Item.FindControl("pdProfileDisplay") as
                            ProfileDisplay;
        pd.LoadDisplay((Account)e.Item.DataItem);
        if(_webContext.CurrentUser == null)
            pd.ShowFriendRequestButton = false;
    }
}


The ProfileDisplay control also has a couple of properties one to show/hide the delete friend button and the other to show/hide the invite friend button. These buttons are not appropriate for every page that the control is used in. In the search results page we want to hide the Delete button as the results are not necessarily friends. We would want to be able to invite them in that view. However, in a list of our friends the Invite button (to invite a friend) would no longer be appropriate as each of these users would already be a friend. The Delete button in this case would now be more appropriate.

Clicking on the Invite button makes a call to the Redirector class and routes the user to the InviteFriends page.

//UserControls/ProfileDisplay.ascx.cs
public void SendFriendRequest(Int32 AccountIdToInvite)
{
    _redirector.GoToFriendsInviteFriends(AccountIdToInvite);
}

//Core/Impl/Redirector.cs
public void GoToFriendsInviteFriends(Int32 AccoundIdToInvite)
{
    Redirect("~/Friends/InviteFriends.aspx?AccountIdToInvite=" +
             AccoundIdToInvite.ToString());
}


Inviting your friends

This page allows us to manually enter email addresses of friends whom we want to invite. It is a standard From, To, Message format where the system specifies the sender (you), you specify who to send to and the message that you want to send.

//Friends/InviteFriends.aspx
<%@ Page Language="C#" MasterPageFile="~/SiteMaster.Master"
    AutoEventWireup="true" CodeBehind="InviteFriends.aspx.cs"
    Inherits="Fisharoo.FisharooWeb.Friends.InviteFriends" %>
<asp:Content ContentPlaceHolderID="Content" runat="server">
    <div class="divContainer">
        <div class="divContainerBox">
            <div class="divContainerTitle">Invite Your Friends</div>
            <asp:Panel ID="pnlInvite" runat="server">
                <div class="divContainerRow">
                    <div class="divContainerCellHeader">From:</div>
                    <div class="divContainerCell"><asp:Label
                       ID="lblFrom" runat="server"></asp:Label></div>
                </div>
                <div class="divContainerRow">
                    <div class="divContainerCellHeader">To:<br /><div
                         class="divContainerHelpText">(use commas
                         to<BR />separate emails)</div></div>
                    <div class="divContainerCell"><asp:TextBox
                             ID="txtTo" runat="server"
                       TextMode="MultiLine" Columns="40"
                           Rows="5"></asp:TextBox></div>
                </div>
                <div class="divContainerRow">
                    <div
                        class="divContainerCellHeader">Message:</div>
                    <div class="divContainerCell"><asp:TextBox
                            ID="txtMessage" runat="server"
                      TextMode="MultiLine" Columns="40"
                          Rows="10"></asp:TextBox></div>
                </div>
                <div class="divContainerFooter">
                    <asp:Button ID="btnInvite" runat="server"
                           Text="Invite" OnClick="btnInvite_Click" />
                </div>
            </asp:Panel>
            <div class="divContainerRow">
                <div class="divContainerCell"><br /><asp:Label
                        ID="lblMessage" runat="server">
                       </asp:Label><br /><br /></div>
            </div>
        </div>
    </div>
</asp:Content>


Running the code will display the following:

This is a simple page, so the majority of the code for it is MVP plumbing. The most important part to notice here is that when the Invite button is clicked the presenter is notified to send the invitation.


//Friends/InviteFriends.aspx.cs
using System;
using System.Collections;
using System.Configuration;
using System.Data;
using System.Linq;
using System.Web;
using System.Web.Security;
using System.Web.UI;
using System.Web.UI.HtmlControls;
using System.Web.UI.WebControls;
using System.Web.UI.WebControls.WebParts;
using System.Xml.Linq;
using Fisharoo.FisharooWeb.Friends.Interface;
using Fisharoo.FisharooWeb.Friends.Presenter;

namespace Fisharoo.FisharooWeb.Friends
{
    public partial class InviteFriends : System.Web.UI.Page,
                                         IInviteFriends
    {
        private InviteFriendsPresenter _presenter;
        protected void Page_Load(object sender, EventArgs e)
        {
            _presenter = new InviteFriendsPresenter();
            _presenter.Init(this);
        }

        protected  void btnInvite_Click(object sender, EventArgs e)
        {
            _presenter.SendInvitation(txtTo.Text,txtMessage.Text);
        }

        public void DisplayToData(string To)
        {
            lblFrom.Text = To;
        }

        public void TogglePnlInvite(bool IsVisible)
        {
            pnlInvite.Visible = IsVisible;
        }

        public void ShowMessage(string Message)
        {
            lblMessage.Text = Message;
        }

        public void ResetUI()
        {
            txtMessage.Text = "";
            txtTo.Text = "";
        }
    }
}


Once this call is made we leap across to the presenter (more plumbing!).


//Friends/Presenter/InviteFriendsPresenter.cs
using System;
using System.Data;
using System.Configuration;
using System.Linq;
using System.Web;
using System.Web.Security;
using System.Web.UI;
using System.Web.UI.HtmlControls;
using System.Web.UI.WebControls;
using System.Web.UI.WebControls.WebParts;
using System.Xml.Linq;
using Fisharoo.FisharooCore.Core;
using Fisharoo.FisharooCore.Core.DataAccess;
using Fisharoo.FisharooCore.Core.Domain;
using Fisharoo.FisharooWeb.Friends.Interface;
using StructureMap;

namespace Fisharoo.FisharooWeb.Friends.Presenter
{
    public class InviteFriendsPresenter
    {
        private IInviteFriends _view;
        private IUserSession _userSession;
        private IEmail _email;
        private IFriendInvitationRepository
              _friendInvitationRepository;
        private IAccountRepository _accountRepository;
        private IWebContext _webContext;
        private Account _account;
        private Account _accountToInvite;

        public void Init(IInviteFriends view)
        {
            _view = view;
            _userSession = ObjectFactory.GetInstance<IUserSession>();
            _email = ObjectFactory.GetInstance<IEmail>();
            _friendInvitationRepository =
                                    ObjectFactory.GetInstance<
                                    IFriendInvitationRepository>();
            _accountRepository =
                     ObjectFactory.GetInstance<IAccountRepository>();
            _webContext = ObjectFactory.GetInstance<IWebContext>();
            _account = _userSession.CurrentUser;

            if (_account != null)
            {
                _view.DisplayToData(_account.FirstName + " " +
                                   _account.LastName + " &lt;" +
                                   _account.Email + "&gt;");

                if (_webContext.AccoundIdToInvite > 0)
                {
                    _accountToInvite =
                                  _accountRepository.GetAccountByID
                                 (_webContext.AccoundIdToInvite);

                    if (_accountToInvite != null)
                    {
                        SendInvitation(_accountToInvite.Email,
                                       _account.FirstName + " " +
                                     _account.LastName + " would like
                                     to be your friend!");
                        _view.ShowMessage(_accountToInvite.Username +
                                 " has been sent a friend request!");
                        _view.TogglePnlInvite(false);
                    }
                }
            }
        }

        public void SendInvitation(string ToEmailArray, string
                                   Message)
        {
            string resultMessage = "Invitations sent to the following
                                    recipients:<BR>";
            resultMessage +=
                      _email.SendInvitations
                    (_userSession.CurrentUser,ToEmailArray, Message);
            _view.ShowMessage(resultMessage);
            _view.ResetUI();
        }
    }
}


The interesting thing here is the SendInvitation() method, which takes in a comma delimited array of emails and the message to be sent in the invitation. It then makes a call to the Email.SendInvitations() method.


//Core/Impl/Email.cs
public string SendInvitations(Account sender, string ToEmailArray,
                              string Message)
{
    string resultMessage = Message;
    foreach (string s in ToEmailArray.Split(','))
    {
        FriendInvitation friendInvitation = new FriendInvitation();
        friendInvitation.AccountID = sender.AccountID;
        friendInvitation.Email = s;
        friendInvitation.GUID = Guid.NewGuid();
        friendInvitation.BecameAccountID = 0;
        _friendInvitationRepository.SaveFriendInvitation(friendInvitation);

        //add alert to existing users alerts
        Account account = _accountRepository.GetAccountByEmail(s);
        if(account != null)
        {
            _alertService.AddFriendRequestAlert(_userSession.CurrentUser,
                                  account, friendInvitation.GUID,
                                                Message);
        }

        //TODO: MESSAGING - if this email is already in our system
                            add a message through messaging system
        //if(email in system)
        //{
        //      add message to messaging system
        //}
        //else
        //{
        //      send email
        SendFriendInvitation(s, sender.FirstName, sender.LastName,
                          friendInvitation.GUID.ToString(), Message);
        //}
        resultMessage += "• " + s + "<BR>";
    }
    return resultMessage;
}

This method is responsible for parsing out all the emails, creating a new FriendInvitation, and sending the request via email to the person who was invited. It then adds an alert to the invited user if they have an Account. And finally we have to add a notification to the messaging system once it is built.


Outlook CSV importer

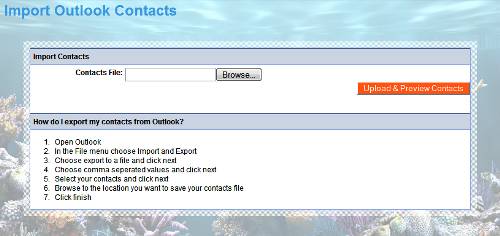
The Import Contacts page is responsible for allowing our users to upload an exported contacts file from MS Outlook into our system. Once they have imported their contacts, the user is allowed to select which email addresses are actually invited into our system.


Importing contacts

As this page is made up of a couple of views, let's begin with the initial view.

//Friends/OutlookCsvImporter.aspx
<asp:Panel ID="pnlUpload" runat="server">
    <div class="divContainerTitle">Import Contacts</div>
    <div class="divContainerRow">
        <div class="divContainerCellHeader">Contacts File:</div>
        <div class="divContainerCell"><asp:FileUpload ID="fuContacts"
             runat="server" /></div>
    </div>
    <div class="divContainerRow">
        <div class="divContainerFooter"><asp:Button ID="btnUpload"
              Text="Upload & Preview Contacts" runat="server"
              OnClick="btnUpload_Click" /></div>
    </div>
    <br /><br />
    <div class="divContainerRow">
        <div class="divContainerTitle">How do I export my contacts
                                       from Outlook?</div>
        <div class="divContainerCell">
            <ol>
                <li>
                    Open Outlook
                </li>
                <li>
                    In the File menu choose Import and Export
                </li>
                <li>
                    Choose export to a file and click next
                </li>
                <li>
                    Choose comma seperated values and click next
                </li>
                <li>
                    Select your contacts and click next
                </li>
                <li>
                    Browse to the location you want to save your
                    contacts file
                </li>
                <li>
                    Click finish
                </li>
            </ol>
        </div>
    </div>
</asp:Panel>


As you can see from the code we are working in panels here. This panel is responsible for allowing a user to upload their Contacts CSV File. It also gives some directions to the user as to how to go about exporting contacts from Outlook. This view has a file upload box that allows the user to browse for their CSV file, and a button to tell us when they are ready for the upload.

There is a method in our presenter that handles the button click from the view.

//Friends/Presenter/OutlookCsvImporterPresenter.cs
public void ParseEmails(HttpPostedFile file)
{
    using (Stream s = file.InputStream)
    {
        StreamReader sr = new StreamReader(s);
        string contacts = sr.ReadToEnd();

        _view.ShowParsedEmail(_email.ParseEmailsFromText(contacts));
    }
}

This method is responsible for handling the upload process of the HttpPostedFile. It puts the file reference into a StreamReader and then reads the stream into a string variable named contacts. Once we have the entire list of contacts we can then call into our Email class and parse all the emails out.

//Core/Impl/Email.cs
public List<string> ParseEmailsFromText(string text)
{
    List<string> emails = new List<string>();
    string strRegex = @"w+([-+.]w+)*@w+([-.]w+)*.w+([-.]w+)*";
    Regex re = new Regex(strRegex, RegexOptions.Multiline);
    foreach (Match m in re.Matches(text))
    {
        string email = m.ToString();
        if(!emails.Contains(email))
            emails.Add(email);
    }
    return emails;
}

This method expects a string that contains some email addresses that we want to parse. It then parses the emails using a regular expression (which we won't go into details about!). We then iterate through all the matches in the Regex and add the found email addresses to our list provided they aren't already present. Once we have found all the email addresses, we will return the list of unique email addresses. The presenter then passes that list of parsed emails to the view.


Selecting contacts

Once we have handled the upload process and parsed out the emails, we then need to display all the emails to the user so that they can select which ones they want to invite.

Now you could do several sneaky things here. Technically the user has uploaded all of their email addresses to you. You have them. You could store them. You could invite every single address regardless of what the user wants. And while this might benefit your community over the short run, your users would eventually find out about your sneaky practice and your community would start to dwindle. Don't take advantage of your user's trust!

//Friends/OutlookCsvImporter.aspx
<asp:Panel visible="false" ID="pnlEmails" runat="server">
    <div class="divContainerTitle">Select Contacts</div>
    <div class="divContainerFooter"><asp:Button
            ID="btnInviteContacts1" runat="server"
            OnClick="btnInviteContacts_Click"
            Text="Invite Selected Contacts"
                                       /></div>
    <div class="divContainerCell" style="text-align:left;">
        <asp:CheckBoxList ID="cblEmails"  RepeatColumns="2"
                       runat="server"></asp:CheckBoxList>
    </div>
    <div class="divContainerFooter"><asp:Button
            ID="btnInviteContacts2" runat="server"
       OnClick="btnInviteContacts_Click" 
          Text="Invite Selected Contacts" /></div>
</asp:Panel>

Notice that we have a checkbox list in our panel. This checkbox list is bound to the returned list of email addresses.

public void ShowParsedEmail(List<string> Emails)
{
    pnlUpload.Visible = false;
    pnlResult.Visible = false;
    pnlEmails.Visible = true;
    cblEmails.DataSource = Emails;
    cblEmails.DataBind();
}

The output so far looks like this:

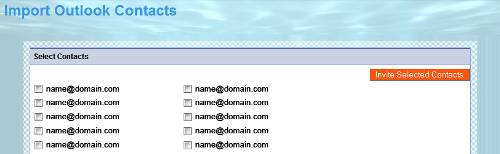
Now the user has a list of all the email addresses that they uploaded, which they can then go through selecting the ones that they want to invite into our system. Once they are through selecting the emails that they want to invite, they can click on the Invite button. We then iterate through all the items in the checkbox list to locate the selected items.

protected void btnInviteContacts_Click(object sender, EventArgs e)
{
    string emails = "";
    foreach (ListItem li in cblEmails.Items)
    {
        if(li != null && li.Selected)
            emails += li.Text + ",";
    }
    emails = emails.Substring(0, emails.Length - 1);
    _presenter.InviteContacts(emails);
}

Once we have gathered all the selected emails, we pass them to the presenter to run the invitation process.

public void InviteContacts(string ToEmailArray)
{
    string result = _email.SendInvitations(_userSession.CurrentUser,
                                           ToEmailArray, "");
    _view.ShowInvitationResult(result);
}

The presenter promptly passes the selected items to the Email class to handle the invitations. This is the same method that we used in the last section to invite users.

//Core/Impl/Email.cs
public string SendInvitations(Account sender, string ToEmailArray,
                              string Message)
{
...
}

We then output the result of the emails that we invited into the third display.

<asp:Panel ID="pnlResult" runat="server" Visible="false">
    <div class="divContainerTitle">Invitations Sent!</div>
    <div class="divContainerCell">
        Invitations were sent to the following emails:<br />
        <asp:Label ID="lblMessage" runat="server"></asp:Label>
    </div>
</asp:Panel>


Confirm friendship

Having covered all these ways to invite someone into our site, we now need to look at what the invited user sees in the invitation. Let's start with what they would see in their inbox.

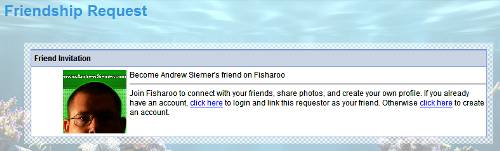
The user gets an email in their inbox telling them that so and so has invited them to come to Fisharoo. Once they open that email, they can see the request again as well as the link that they can follow to the site to take advantage of the invitation.

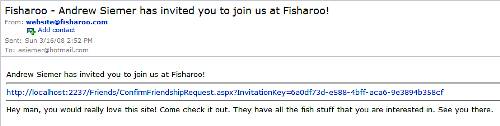
As you can see this link brings them to server/Friends/ConfirmFriendshipRequest.aspx with a GUID for an invitation key. There are two screens that the user might see after this point. The first screen is for the users who are already members. It asks them to log in again to confirm the friendship.

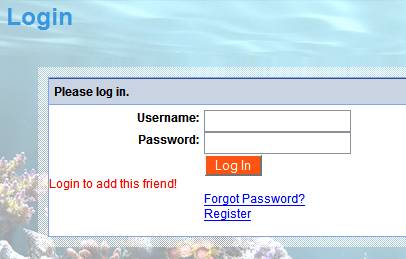
The other screen is for the users who aren't members, or the users who aren't logged in.

The only real logic in the ConfirmFriendshipRequest.aspx page is to check the GUID that is passed in to make sure that it is valid. This happens in the presenter of this page.

public void Init(IConfirmFriendshipRequest view)
{
    _view = view;
    if (!string.IsNullOrEmpty(_webContext.FriendshipRequest))
    {
        FriendInvitation friendInvitation =
            _friendInvitationRepository.GetFriendInvitationByGUID(new
                                Guid(_webContext.FriendshipRequest));
        if(friendInvitation != null)
        {
            if (_webContext.CurrentUser != null)
                LoginClick();

            Account account =
                       _accountRepository.GetAccountByID
                       (friendInvitation.AccountID);
            _view.ShowConfirmPanel(true);
            _view.LoadDisplay(_webContext.FriendshipRequest,
                          account.AccountID, account.FirstName,
                         account.LastName, _configuration.SiteName );
        }
        else
        {
            _view.ShowConfirmPanel(false);
            _view.ShowMessage("There was an error validating your
                              invitation.");
        }
    }
}

Either we can load a friendInvitation from the GUID or not. If we can, then we check to see if the user is already a member of the system and logged in. If they are logged in we automatically redirect them to the login screen. Otherwise we prompt them to log in or create an account. If the friendInvitaiton can't be loaded properly, then we show an error explaining that. Where the real magic occurs for the invitation process is in the login and registration pages.


Login

In the login presenter we have added some logic to the Init method to recognize if we have a friendship request or not.

//Accounts/Presenter/LoginPresenter.cs
public void Init(ILogin view)
{
    _view = view;
    _accountService = ObjectFactory.GetInstance<IAccountService>();
    _redirector = ObjectFactory.GetInstance<IRedirector>();
    _webContext = ObjectFactory.GetInstance<IWebContext>();

    if(!string.IsNullOrEmpty(_webContext.FriendshipRequest))
        _view.DisplayMessage("Login to add this friend!");
}

This logic lets the user know that by logging in they will be accepting the friend request. Then in the AccountService.cs file we have added some additional logic. If the login is a success and there is a friend request, we confirm the request and make these two users friends, via the FriendService we discussed in the first part of this article.

//Core/Impl/AccountService.cs
public string Login(string Username, string Password)
{
    ...
            if (account.EmailVerified)
            {
                _userSession.LoggedIn = true;
                _userSession.Username = Username;
                _userSession.CurrentUser =
                                   GetAccountByID(account.AccountID);

                if(!string.IsNullOrEmpty(_webContext.FriendshipRequest))
                {
                    _friendService.CreateFriendFromFriendInvitation
                      (new Guid(_webContext.FriendshipRequest),_userSession.CurrentUser);
                }

                ...
}


Registration

If the invited friend is not already a user of the site, then we allow them to walk through the registration site as normal. Once the registration is complete, we not only register them but we also create the friendship.

//Accounts/Presenter/RegisterPresenter.cs
public void Register(string Username, string Password,
                    string FirstName, string LastName, string Email,
                    string Zip, DateTime BirthDate, string Captcha,
                    bool AgreesWithTerms, Int32 TermID)
{
    ...

                //if this registration came via a friend request...
                if(friendInvitation != null)
                {
                    _friendService.CreateFriendFromFriendInvitation
                    (new Guid(_webContext.FriendshipRequest),newAccount);
                }

...

}


Show friends

Now that we have everything we need to invite and accept a friend, we need the ability to see our friends. For this we will add to our Friends section landing page (Default.aspx) a list of all our friends. This will actually be quite easy as we will use our ProfileDisplay user control that we created earlier for our Search page. This page will simply consist of a repeater with our ProfileDisplay control. We set the ShowFriendRequestButton to false as these are already our friends.

<asp:Repeater ID="repFriends" runat="server"
                  OnItemDataBound="repFriends_ItemDataBound">
    <ItemTemplate>
        <div class="divContainerRow" style="height:110px;">
            <div class="divContainerCell">
                <Fisharoo:ProfileDisplay
                         ShowFriendRequestButton="false"
                     ID="pdProfileDisplay" runat="server" />
            </div>
        </div>
    </ItemTemplate>
</asp:Repeater>

Our presenter then loads the display with all the current user's friends by calling into the FriendRepository.GetFriendsAccountsByAccountID() method and passing that collection down to the view.

public void LoadDisplay()
{
    _view.LoadDisplay(_friendRepository.GetFriendsAccountsByAccountID
                     (_userSession.CurrentUser.AccountID));
}

The view then hooks up the repeater's data source. On each ItemDataBound of the repeater we spin up the ProfileDisplay user control.

protected void repFriends_ItemDataBound(object sender,
                                        RepeaterItemEventArgs e)
{
    if(e.Item.ItemType == ListItemType.Item || e.Item.ItemType ==
       ListItemType.AlternatingItem)
    {
        ProfileDisplay pdProfileDisplay =
            e.Item.FindControl("pdProfileDisplay") as ProfileDisplay;
          pdProfileDisplay.LoadDisplay(((Account)e.Item.DataItem));
    }
}

We then end up with this output:
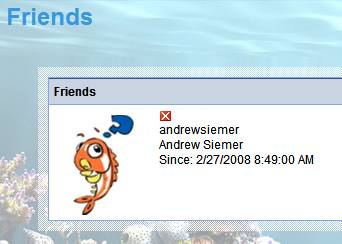
Friends on profile

After having a page that shows all of our friends, it should be easy to update our public profile to show a handful of friends. To do this we will open the Profile.aspx page and add to it a bit. We are simply going to add the same sort of repeater to the profile page as we did in the case of the Friends/Default.aspx page.

<asp:Repeater ID="repFriends" runat="server"
                    OnItemDataBound="repFriends_ItemDataBound">
    <ItemTemplate>
        <Fisharoo:ProfileDisplay ShowFriendRequestButton="false"
                  ShowDeleteButton="false" ID="pdProfileDisplay"
                             runat="server" />
    </ItemTemplate>
</asp:Repeater>

Then in our ProfilePresenter.cs file we have added a line that loads that repeater.

public void Init(IProfile View)
{
    _view = View;
    _view.SetAvatar(_accountBeingViewed.AccountID);
    _view.DisplayInfo(_accountBeingViewed);
 _view.LoadFriends(_friendRepository.GetFriendsAccountsByAccountID(_accountBeingViewed.AccountID));
    _view.LoadStatusUpdates(_statusUpdateRepository.GetTopNStatusUpdatesB
                        yAccountID(_accountBeingViewed.AccountID,5));
    TogglePrivacy();
}

And in the Profile.aspx.cs file we have added an event handler for repFriends_ItemDataBound() that takes care of loading each ProfileDisplay control.

protected void repFriends_ItemDataBound(object sender,
                                       RepeaterItemEventArgs e)
{
    if(e.Item.ItemType == ListItemType.Item || e.Item.ItemType ==
                          ListItemType.AlternatingItem)
    {
        ProfileDisplay pdProfileDisplay =
            e.Item.FindControl("pdProfileDisplay") as ProfileDisplay;
        pdProfileDisplay.LoadDisplay(((Account)e.Item.DataItem));
    }
}


Status updates

Status updates (our micro blog) are very simple to implement at this point. We will need to open the master page and add a small section to take in and display a top listing of these updates. In our master page we will add a panel to our global display. It will be responsible for taking in new updates as well as displaying the most recent updates.

//SiteMaster.master
<asp:Panel ID="pnlStatusUpdate" runat="server">
    <div class="divContainer">
        <div class="divContainerBox">
            <div class="divContainerTitle">Status Updates</div>
            <div class="divContainerCell">
                <asp:TextBox Width="85" style="font-size:9px;padding-left:0px;padding-right:0px;"
                             id="txtStatusUpdate"
                          runat="server"></asp:TextBox>
                <asp:Button style="font-size:9px;padding-left:0px;padding-right:0px;"
                            ID="btnAddStatus" runat="server"
                     Text="Add" OnClick="btnAddStatus_Click" /><br />
                <asp:Repeater runat="server" ID="repStatus">
                    <ItemTemplate>
                        <asp:Label ID="Label1" Text='<%# ((StatusUpdate)
                                                     Container.DataItem).CreateDate.ToString() %>'
                         runat="server" style="font-size:9px;"></asp:Label> -
                        <asp:Label ID="Label2" Text='<%# ((StatusUpdate)Container.DataItem).Status %>'
                        runat="server"
                      style="font-size:9px;"></asp:Label>
                    </ItemTemplate>
                    <SeparatorTemplate>
                        <div class="divContainerSeparator"></div>
                    </SeparatorTemplate>
                </asp:Repeater><br />
                <asp:Button ID="btnShowAllStatusUpdates"
                         runat="server" Text="View All" OnClick="btnShowAllStatusUpdates_Click" />
            </div>
    </div></div>
</asp:Panel>

Once the display is in place, we need to add a method to capture our button clicks so that we can add new updates.

//SiteMaster.master.cs
protected void btnAddStatus_Click(object sender, EventArgs e)
{
    StatusUpdate su = new StatusUpdate();
    su.CreateDate = DateTime.Now;
    su.AccountID = _userSession.CurrentUser.AccountID;
    su.Status = txtStatusUpdate.Text;
    _statusRepository.SaveStatusUpdate(su);

    _alertService.AddStatusUpdateAlert(su);
    _redirector.GoToHomePage();
}

This method spins up a new StatusUpdate and adds it to the StatusUpdateRepository. While we are here we need to add another method to handle the button click to show all status updates.

//SiteMaster.master.cs
protected void btnShowAllStatusUpdates_Click(object sender,
                                             EventArgs e)
{
    _redirector.GoToProfilesStatusUpdates();
}

As you can see, this method simply redirects via the Redirector class to the Profiles/StatusUpdates.aspx page. This then takes us to displaying our top StatusUpdates in the master page. To do this we need to add the method that gets the top N StatusUpdates.

//SiteMaster.master.cs
protected void LoadStatus()
{
    repStatus.DataSource =
        _statusRepository.GetTopNStatusUpdatesByAccountID(_userSession.Curren
                                                 tUser.AccountID, 5);
    repStatus.DataBind();
}

With this in place we need to update the Page_Load() method of the master page so that the status updates are loaded when there is a user logs into the site.

//SiteMaster.master.cs
protected void Page_Load(object sender, EventArgs e)
{
    ...

    if (_userSession.CurrentUser != null)
    {
        LoadStatus();
        pnlStatusUpdate.Visible = true;
    }
    else
        pnlStatusUpdate.Visible = false;
}

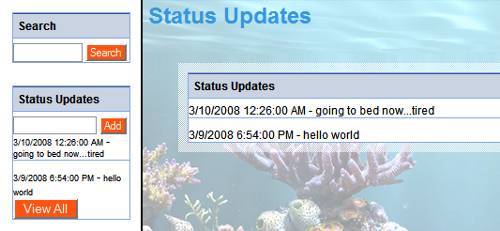
Now that we have a way to capture new status updates as well as a way to display the most recent updates, we need to provide a way for our user to see all of their updates. We will do this with a page dedicated to showing this data.

//Friends/StatusUpdates.aspx
<asp:Repeater ID="repStatusUpdates" runat="server">
    <ItemTemplate>
        <%# ((StatusUpdate)Container.DataItem).CreateDate.ToString()
        %> -
        <%# ((StatusUpdate)Container.DataItem).Status %>
    </ItemTemplate>
    <SeparatorTemplate>
        <div class="divContainerSeparator"></div>
    </SeparatorTemplate>
</asp:Repeater>

This page of course has the same plumbing issues as do the others. But it basically boils down to calling into the StatusUpdateRepository and get all StatusUpdates for a given Account. The only difference between this and showing the TopN StatusUpdates, as we did on the master page, is that we will show all the updates here.


Summary

This part of the article began with the implementation of the presentation layer. Then it covered different methods to locate and invite our friends to join our network. Finally we saw how to extend certain services to develop an alerts system, so that our friends remain updated about what we are doing in community.

This article is extracted from the book
ASP.NET 3.5 Social Networking

Similar Articles